February 2016
Monthly Archive
February 19, 2016
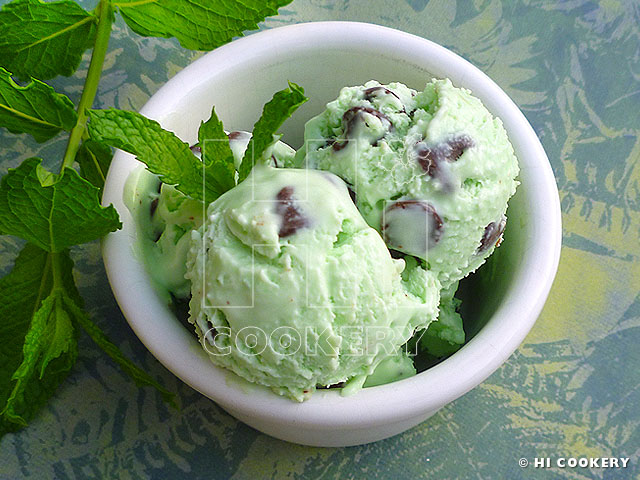
No-Churn Mint
Chocolate Chip Ice Cream
February 19: National Chocolate Mint Day
We admire our friends Pat and Phyllis S. who have “green” thumbs. Their garden is filled with flowers, fruits and vegetables and they can survive off the land. Our new townhome does not have much “green” space (just mostly a small paved walkway) and we don’t have to maintain any plants. But we are required to pay outrageous Home Owners Association (HOA) fees to take care of the common areas for curbside appeal!
Thankfully, our friends share some of the natural bounty from their backyard. In exchange, we share recipes for homemade no-churn ice cream (since we are wary of listeria from the local creamery). Ironically, when they brought us fresh mint from their garden to make mint chocolate chip ice cream, the recipe did not contain the herb as an ingredient (we used a store-bought mint extract instead). But the mint leaves made for a pretty garnish.
Eventually, in addition to making no-churn mint chocolate chip ice cream, we made mint extract with the extra leaves from the bunch that Pat and Phyllis gave us. The bonus recipe is below.
Try making a homemade no-churn mint chocolate ice cream with homemade mint extract for National Chocolate Mint Day!
Recipe
(Inspired by Nigella)
Ingredients
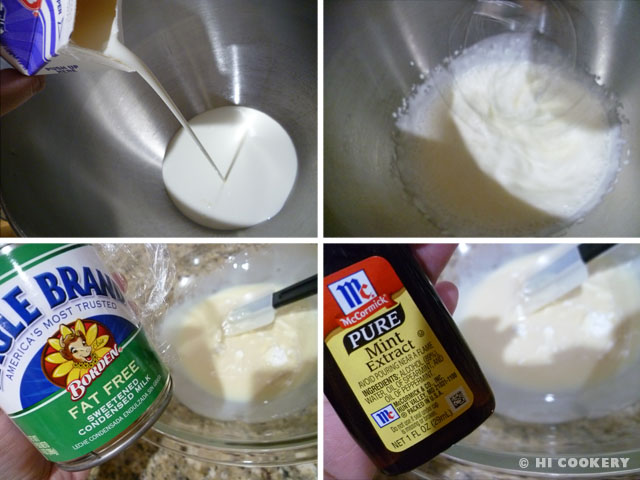
- 2 cups heavy whipping cream (cold)
- 1 can (14 ounces) sweetened condensed milk
- ½ – 1 teaspoon mint extract (see Bonus Recipe below or use store-bought)
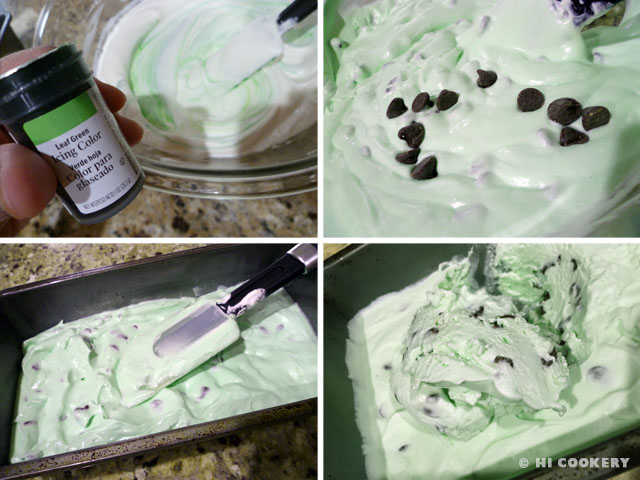
- a few drops of green food coloring
- 1 cup chocolate chips (recommend mini size)
- fresh mint leaves to garnish (optional)
Directions
Beat the cream until stiff peaks form. In a large bowl, mix the condensed milk with the mint extract. Fold the whipped cream into this mixture until smooth, being careful not to whip more air into it. Add a few drops of green food coloring and stir well until the desired color of light mint green is achieved.
Fold in the chocolate chips and mix until distributed well. Place the mixture into a loaf pan. Cover and freeze for at least six hours or overnight. Remove from the freezer. Let stand for a few minutes and scoop into cones or dessert dishes. Garnish with fresh mint leaves (optional).
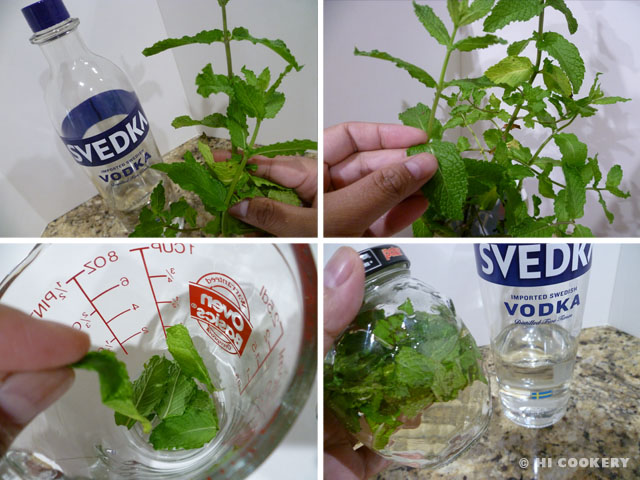
Bonus Recipe: Homemade Mint Extract
Ingredients
- ½ cup individual mint leaves
- 1 – 1 ½ cup vodka
Directions
Rinse and pat dry the mint leaves. Crush them with your fingers to help release its natural oils. Place in a jar and pour vodka to cover the leaves. Seal the jar and let steep in a dark, cool place for at least a month or until it reaches the desired minty flavor. Use the liquid as you normally would in recipes (like in the above no-churn mint chocolate ice cream) that call for mint extract.
Notes
- Mahalo nui loa (thank you very much in Hawaiian) to Pat and Phyllis S. for giving us a bunch of fresh mint leaves from their garden.
- Try substituting the chocolate chips with Andes brand crème de menthe chocolate mint baking chips for an even more minty flavor in this no-churn ice cream recipe.
- Try substituting the ½ teaspoon mint extract for 1-2 tablespoons crème de menthe liqueur.
- Search our blog for other recipes containing chocolate and mint combination.
February 17, 2016
Stir-Fried Baby Bok Choy with
Shiitake Mushrooms and Tofu

February 17: National Cabbage Day
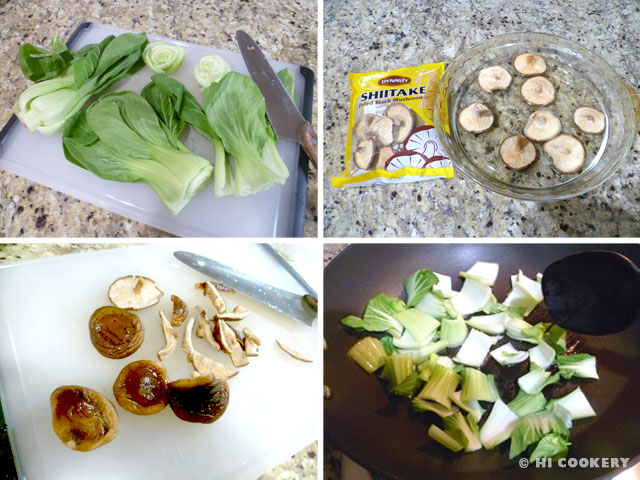
During Lent, we prefer a good stir-fry over a fish fry. Stir-fried baby bok choy, shiitake mushrooms and tofu is one of our favorite meatless Friday dishes to eat with a simple bowl of steamed rice. This healthy and hearty dish features a popular variety of Chinese cabbage (bok choy)—a green vegetable option that is considered auspicious especially in the lunar new year—as well as “meaty” mushrooms and protein-packed tofu in a tasty sauce. Savor this simple stir-fried dish during Lent Fridays, lunar new year celebrations and National Cabbage Day.
Recipe
(Adapted from Vegetarian Times)
For the mixture
- 1 pound baby bok choy
- 1 cup dried shiitake mushrooms
- 1 package (14 ounces) extra-firm tofu, drained and cut into small cubes (may substitute for fried bean curd puff squares, room temperature)
For the stir-fry sauce (slurry)
- 1 teaspoon cornstarch
- 1 teaspoon water (or liquid from the soaked shiitake mushrooms)
- 2 tablespoons soy sauce
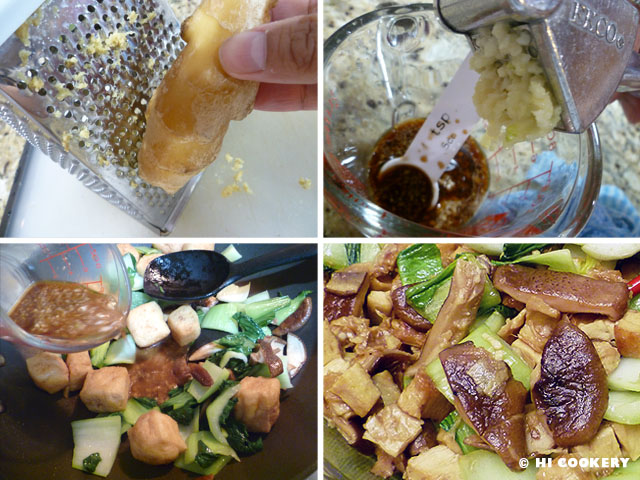
- 2 teaspoons ginger, grated
- 2 cloves garlic, minced
- 1 teaspoon sesame oil
- 3 tablespoons canola or vegetable oil, divided use
Directions
Wash and dry the baby bok choy. Chop off an inch from the bottom stem (reserve “rosettes” for optional garnish). Slice leaves into 2-inch pieces. In a shallow bowl, soak the dried shiitake mushrooms in hot water for 30 minutes or until softened. Squeeze out excess water. Slice into strips. In a wok or large skillet, heat 1 tablespoon of canola or vegetable oil in medium-high heat and gently stir-fry the tofu until lightly browned (do not fry the bean curd puffs if using). Transfer to a plate and keep warm.
In the same skillet, add another tablespoon of oil and stir-fry the mushrooms for 2 minutes or until softened. Transfer to the tofu plate. Add the last tablespoon of oil to the skillet and stir-fry the baby bok choy for a minute. Return the tofu and mushrooms to the skillet and mix with the baby bok choy.
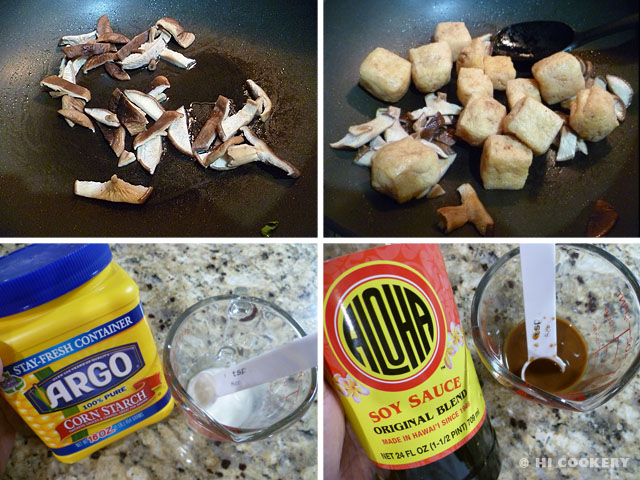
In a small bowl or measuring cup, make a slurry with the cornstarch, water (or mushroom liquid), soy sauce, grated ginger, minced garlic and sesame oil. Pour it into the skillet and mix well until slightly thickened, coating the tofu, mushrooms and baby bok choy well. Transfer to a serving platter immediately and garnish with the baby bok choy “rosettes”. Serve hot.
Notes
- We prefer rehydrated shiitake mushrooms over the fresh ones as the dried shiitake have a stronger flavor.
February 14, 2016
Stained Glass Heart Cookies

February 14: Feast Day of St. Valentine
Islander recently joined a culinary club at the local library where she could meet like-minded people who LOVE to cook and exchange recipes that they have tried from cookbooks, the Internet or family and friends.
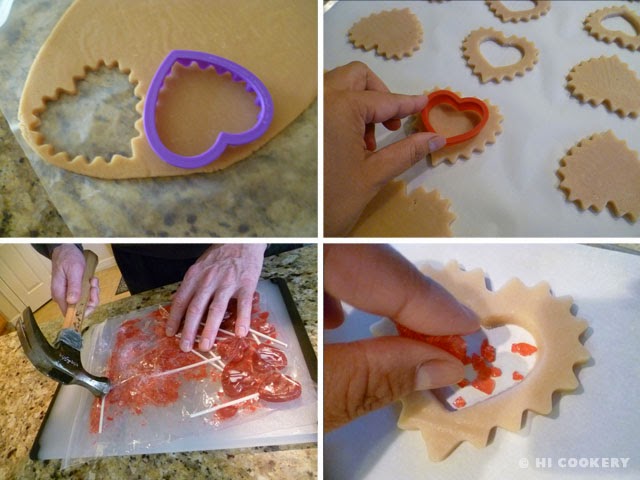
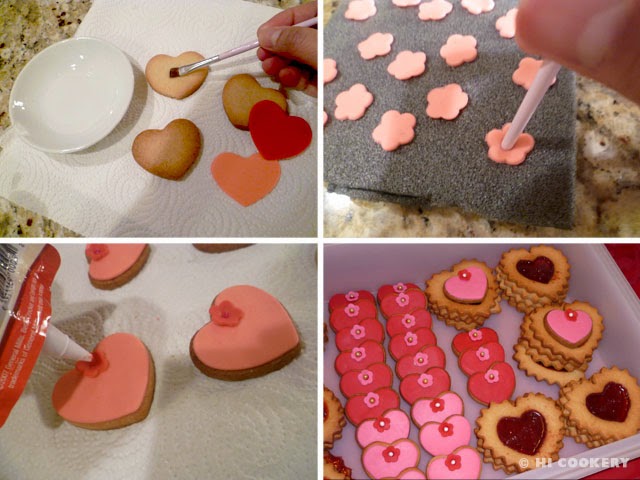
In honor of the month of LOVE, members were asked to share foods that fit this month’s heart-shaped” theme. This gave Islander the opportunity to use her heart-shaped nested cookie cutters to make “stained glass” heart cookies. The middle is melted hard candy, which when cool becomes transparent and cracks like glass when bitten into the cookie. With the extra heart cutouts, she simply decorated them with fondant flowers so there is no waste in the cookie dough.
This is a pretty project for the Feast Day of St. Valentine. So show some LOVE to culinary club members, co-workers, family, friends and your sweetheart by baking stained glass heart cookies. Happy Valentine’s Day!
Recipe
For the stained-glass heart cookies
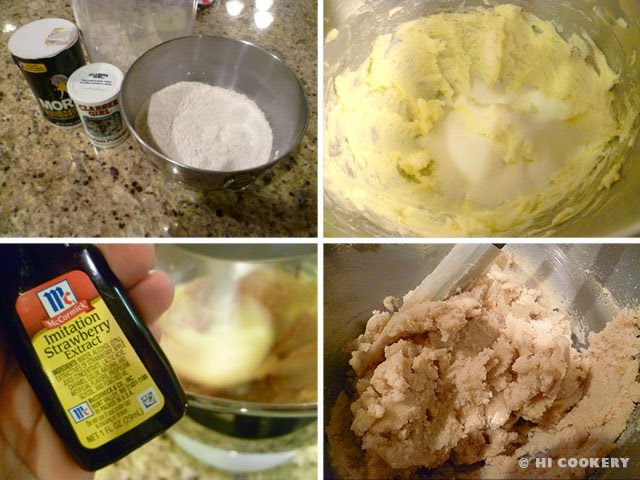
- 3 cups flour (all purpose white)
- 3/4 teaspoon baking powder
- ½ teaspoon salt
- 1 cup (2 sticks) unsalted butter, slightly softened
- 1 cup granulated sugar
- 1 egg
- 1 tablespoon milk
- 1 teaspoon vanilla extract
- 2 teaspoons strawberry or cherry extract
- red hard candy (Jolly Rogers or Life Savers brands), crushed (we used red lollipops)
- red and pink fondant
- gold and silver non-pareil beads
- tube frosting (to attach the beads)
- powdered sugar (to dust the surface)
- clear piping gel or water
For the fondant heart cookies
- Fondant flowers (see tutorial here or here)
- Fondant
- Round non-pareils (we used white and gold)
Directions
In a large bowl, stir together flour, baking powder and salt. In another bowl, mix together the butter and sugar until creamy. Beat in the egg, milk, vanilla and strawberry or cherry extracts. Gradually the flour mixture into the other ingredients and blend well to form a dough.
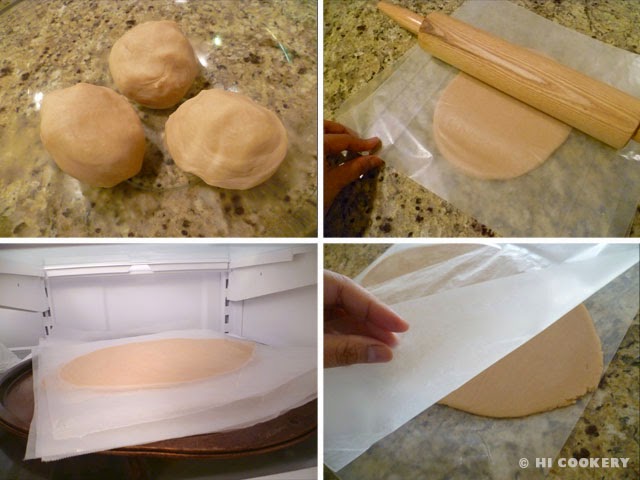
Divide dough in thirds and roll into a ball. Then flatten each ball into a disc and place between sheets of waxed or parchment paper. Roll out to about ¼-inch thick (we used ¼-inch thick acrylic sticks as guides). Stack them on a baking sheet and refrigerate until firm (about 30-45 minutes). They may also be frozen for 15-20 minutes. Take one stack of flattened dough out of the refrigerator or freezer. Peel away both front and back to loosen, leaving the dough on one sheet of the waxed or parchment paper.
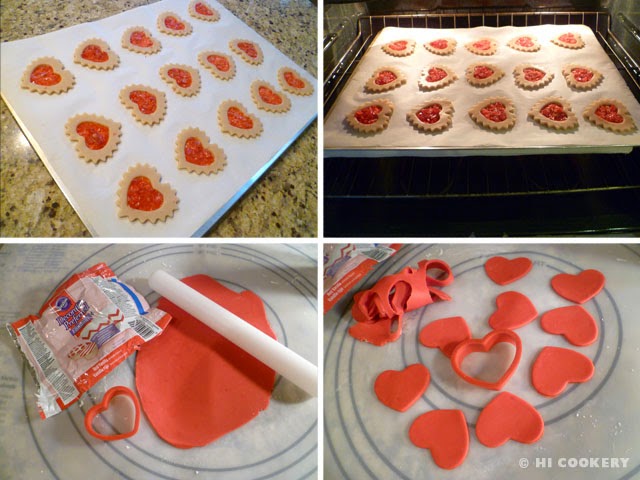
Cut out the larger heart shapes. Place on foil-lined greased cookie pan about 1 ½ – 2 inches apart. Cut out the smaller heart shape in the middle and remove the dough. Refrigerate the cookie pan. Re-roll scraps of dough and cut more shapes, refrigerating if the dough gets too soft. The dough needs to be cold and firm in order to retain its shape. Crush the red hard candies by placing them a zipper top plastic bag and pressing a rolling pin over them (or hammer the heck out of them). Sprinkle onto the cutout center of the cookies, being careful not to overfill or they will overflow (see our Food Flops).
Bake the cookies in a preheated oven at 375 degrees F for 10-15 minutes or until the sides are very lightly browned and the hard candy centers are melted. Remove from the oven when done and let sit on the pan until the candy centers harden (at least 15 minutes). Transfer each cookie on a wire rack to cool completely. Bake the center heart cutout cookies. Cool then decorate with fondant hearts using the same size cookie cutter.
Brush water or piping gel on the cookie. Position the fondant on top of the small heart cookie and smooth out the edges with warm fingers. Repeat for all cookies. Set aside to dry. Make fondant flowers. Attach to the top middle of the heart cookies with tube frosting. Position a gold or white non-pareil bead in the center of the fondant flower by “gluing” it with tube frosting. Let all cookies dry. Store in an airtight container. Arrange on a platter and serve.
Notes
- Cut different cookie shapes and use different colored hard candies for unique occasions.
- See previous posts on how to cover cookies with fondant and how to make fondant flowers here or here.
Next Page »
