06 June


English Queen Cakes

English Queen Cakes

June 2: Coronation of Queen Elizabeth II (1953)

Long live the Queen! Elizabeth II was crowned Queen of England and the Commonwealth, following more than a year-long mourning period of the death of  the preceding sovereign. Her father, King George VI, died on February 6, 1952, and the royal heiress ascended the throne.

A grand coronation ceremony took place on June 2, 1953, at Westminster Abbey. Queen Elizabeth II celebrated her Silver Jubilee in 1977 and her Golden Jubilee in 2002. Year-long celebrations are taking place worldwide for her Diamond Jubilee in 2012.

Have an at-home royal watch party (when the media cover the various Diamond Jubilee events) and include English Queen Cakes for a majestic menu. These individual, simply sweet sponge cakes are tasty as a tea time treat and are appropriate for commemorating the coronation of an English queen!

Recipe

(Adapted from Cook It Simply)

Ingredients

  • ½ cup (1 stick) butter, softened
  • ½ cup sugar
  • 2 eggs
  • ½ cup flour
  • ¾ teaspoon baking powder
  • ¼ teaspoon salt
  • ¼ cup golden raisins (sultanas)

Directions

Line a muffin tin with cupcake papers (we used gold colored liners). In a large bowl, cream the butter with the sugar. In a cup, beat the eggs. Pour the beaten eggs into the butter-sugar mixture. Mix well. In a small bowl, combine the flour, baking powder and salt. Add the flour mixture into the butter-sugar-egg mix. Blend well until the batter is smooth.

English Queen Cakes

Fold in the raisins. Scoop into cupcake liners no more than half full. Bake in a preheated oven at 375 degrees F for 15-20 minutes until golden brown. Remove from the oven and cool completely on wire racks. Yield: 6-8 cupcakes or 12-16 mini-muffins.

English Queen Cakes 

Notes

Pastel de Tres Leches

(3 Milks Cake)

Tres Leches

June: National Dairy Month

A popular cake flavor around South Texas where we live is tres leches (3 milks). This is a favorite of Islander’s brother that he regularly requests it for his birthday and on special occasions.

The cake is soaked in three milks—sweetened condensed milk, evaporated milk and table cream (like a half-and-half milk and cream)—hence, the cake’s name. Then it is frosted in whipped cream mixed with cream cheese! The result is a dense, moist cake with a custard-like texture. Dairy lovers will delight in this cake but, unfortunately, for Islander and others who are intolerant or sensitive to all that dairy will have to long for other lactose-free cakes.

Prepare pastel de tres leches (3 milks cake) for special occasions and during National Dairy Month.

Recipe
(From Señora Eva G.)

For the cake

  • 1 box French vanilla cake mix (we recommend Duncan Hines brand)
  • 3 eggs
  • 1 1/3 cup water
  • 1/3 cup oil

Directions

Prepare the cake mix following the directions on the box. In a large bowl, combine the cake mix with the eggs, water and oil. Blend until smooth.

Tres Leches

Pour into greased cake pans (we used two 8-inch rounds). Bake in a preheated oven at 350 degrees F for 30-40 minutes or until done. Remove from the oven and cool the cakes completely.  Invert the cakes onto a lipped plate (or cake stand with a lip) to catch any leakage. Poke holes all over the top of the cake with the tines of a fork. Set aside to pour the 3 milks mixture.

Tres Leches

For the 3 milks (tres leches) mixture

  • 1 14-ounce can sweetened condensed milk
  • 1 12-ounce can evaporated milk
  • 1 7.5-ounce table cream (we used Nestle brand media crema)
  • 2 tablespoons vanilla (we used Mexican vainilla)

Directions
In a large bowl, mix together the condensed milk, evaporated milk, table cream and vanilla. Stir until smooth. On each cake, spoon the milk mixture over the surface and allow it to seep into the cake. This is a gradual process so be patient. Continue until almost all of the milk mixture is used up. Refrigerate to set for at least half an hour before assembling and frosting the cake.

Tres Leches

For the frosting

  • 2 8-ounce tubs of Cool Whip
  • 1 8-ounce block of cream cheese
  • 6 tablespoons sugar

Directions
In a large bowl, mix the cheese with the sugar until creamy. Fold in the Cool Whip and blend until smooth and spreadable.

Tres Leches

Frost the bottom layer of the cake by generously spreading frosting on the top of it, allowing some of the frosting to overflow to the sides. Carefully place the top layer of the cake on the frosting. Continue to frost the top and sides of the cake, smoothing it out with a spatula.

Tres Leches

For the decorations

  • Kiwi fruit, sliced
  • Strawberries, sliced
  • Pineapples, sliced
  • Pecan nuts, chopped

Directions

Slice the fruits and chop the nuts. Stud the sides of the cake with the pecan pieces. Decorate the top of the cake with the fruits.

Tres Leches

Pipe borders on the top and bottom edges of the cake with extra frosting. Refrigerate the cake until ready to serve.

Tres Leches

Notes

  • Muchas gracias to Señora Eva G. for sharing her family’s recipe with us for our blog. Also thanks to Islander’s brother, Kahuna, for being the guest chef and preparing pastel de tres leches for this post.
  • From-scratch white cakes may be used instead of one made from a box mix. Avoid “soft” cakes like angel food. Instead choose one that is sturdy enough to be able to absorb the milk mixture.
  • Search our blog for more cake recipes.

Tapioca Custard Cake

(Cassava Flan Bibingka)

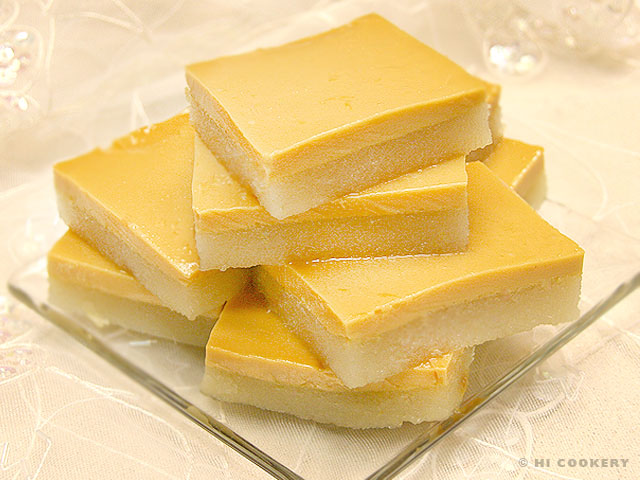
Tapioca Custard Cake - Cassava Flan Bibingka

June 28: National Tapioca Day

Islander literally likes to get back to her cultural roots by baking bibingka (a type of Filipino cake) made from cassava, a starchy root that is sometimes called tapioca, manioc, sago or yuca (not to be confused with yucca). Her Daddy grows the woody-looking tuber in the back yard of her childhood home in Hawaii. Sometimes he would just boil the fibrous root for the family and we would eat it like a yam or sweet potato. Other times, he would manually grate it for a special Christmas tapioca custard cake recipe, such as the one we are featuring here on our blog post for National Tapioca Day. The bottom bibingka layer has a chewy texture with coconut flavor and is topped with a sweet and creamy custard layer. With only six ingredients, this makes it easy for Islander to appreciate both the cultural and culinary roots when cooking!

Recipe

(From Daddy)

 For the tapioca/cassava bibingka/cake

  • 1 package (1 lb.) frozen grated cassava, thawed
  • 1 cup sugar
  • 1 can (13.5 ounces) coconut milk

For the flan/custard

  • 5 egg yolks
  • 1 can (14 ounces) sweetened condensed milk
  • 1 can (12 ounces) evaporated milk

Directions

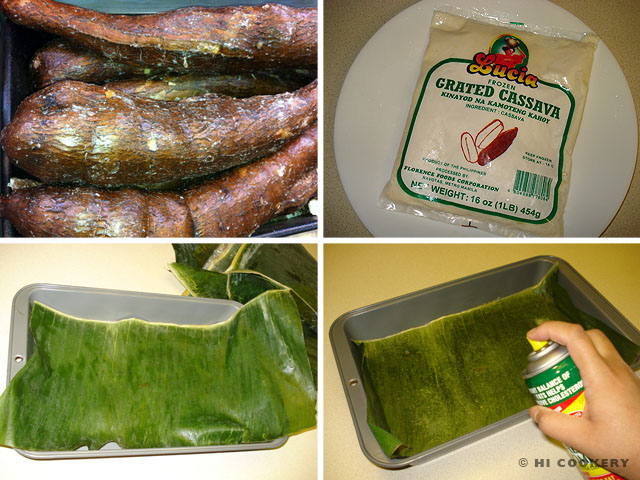
Line a 13×9-inch baking pan with banana leaf (traditional) or waxed paper. Mist with cooking spray.

Tapioca Custard Cake - Cassava Flan Bibingka

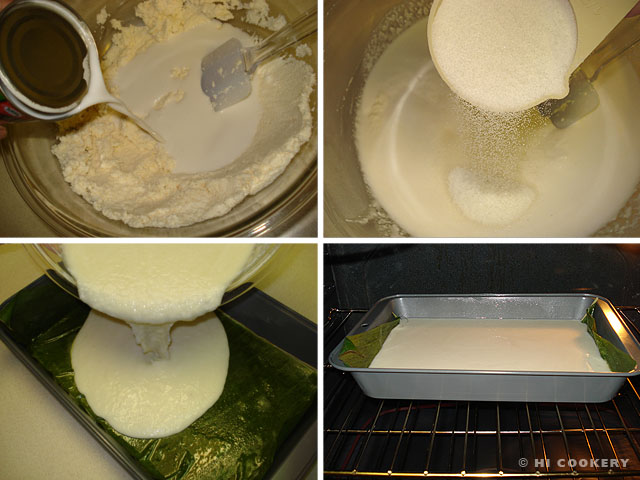
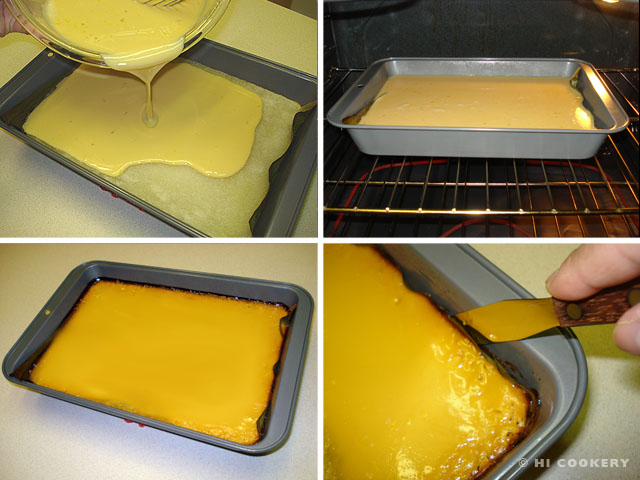
In a bowl, mix together the thawed grated cassava, sugar and coconut milk. Pour into the baking pan. Bake in a preheated oven at 350 degrees F for 30 minutes.

Tapioca Custard Cake - Cassava Flan Bibingka

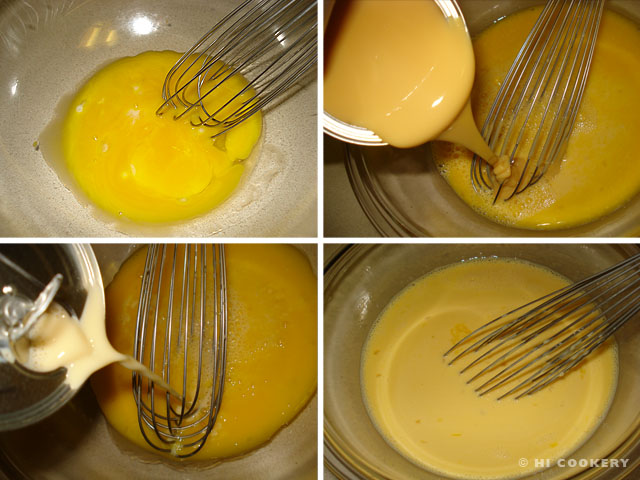
While the bibingka layer is baking, make the flan/custard layer. In a bowl, beat the egg yolks with the sweetened condensed and evaporated milks.

Tapioca Custard Cake - Cassava Flan Bibingka

Remove the bibingka from the oven and pour the flan/custard mixture over it. Return to the oven and bake for an additional 40 minutes or until the flan/custard no longer wiggles in the middle. Remove from the oven. Use a spatula to loosen and unstick the dessert from the sides of the pan. Cool completely until it reaches room temperature to set. Slice into squares and cut off any burnt or jagged edges. Remove the banana leaf or waxed paper before serving. Refrigerate leftovers.

Tapioca Custard Cake - Cassava Flan Bibingka

Notes

  • Warning: Do not eat cassava raw. It must be cooked thoroughly to remove toxins.
  • Some Philippine cuisine has its roots from Spain. For example, the flan/custard layer on top of the Filipino-based bibingka is a Spanish influence. Islander’s family names, both paternal and maternal, are Spanish.

« Previous Page — Next Page »