September 2016
Monthly Archive
September 26, 2016
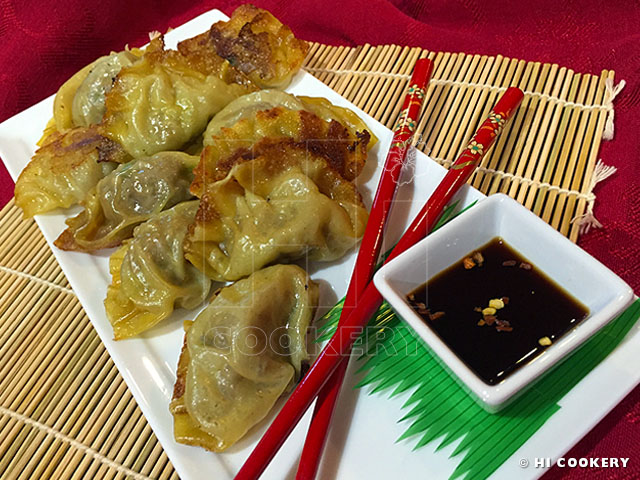
Potstickers (Pork Dumplings)

September 26: National Dumpling Day
We just celebrated a belated 20th anniversary (married in the summer of 1996) by taking a trip to China. The gift associated with this milestone year is china, as in fine bone or porcelain, but we went on a guided tour to the country instead to mark our two decades of marriage.
After stopping in Taiwan for a few days to visit Islander’s college roommate, Monica C., in preparation for the Harvest Moon Festival, we headed to Beijing, Xi’an, Hangzhou, Wuzhen and Shanghai. Of course, we have witnessed many Chinese chefs making delicious dumplings and we have also eaten our fair share of them during our travel!
We have made many meat-filled dishes before but one of our favorite dumplings is potstickers. These appetizers are soft yet a bit crunchy at the same time and are very tasty with a dipping sauce. Sure, they are much easier to order at the Chinese restaurant or buy them frozen at the grocery store. But making these potstickers brings back memories of our most recent anniversary trip and it was a good excuse to cook them in observance of National Dumpling Day.
Recipe
(Adapted from Thyme Bombe)
For the potstickers
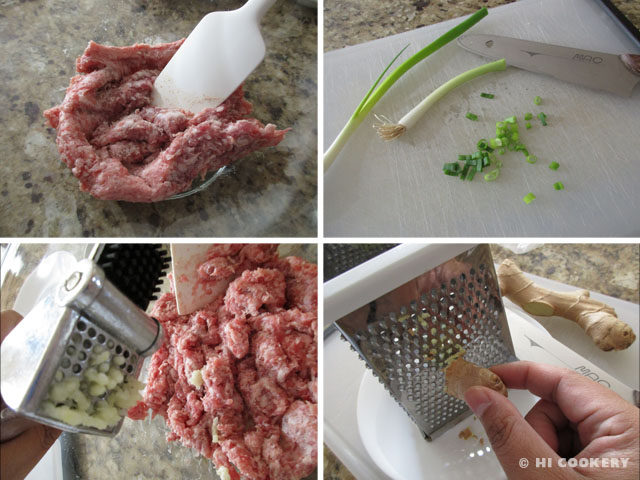
- ½ pound ground pork (or chicken or turkey)
- 1-2 stalks green onion, chopped (green part only)
- 2 cloves of garlic, minced
- 1 teaspoon ginger, grated
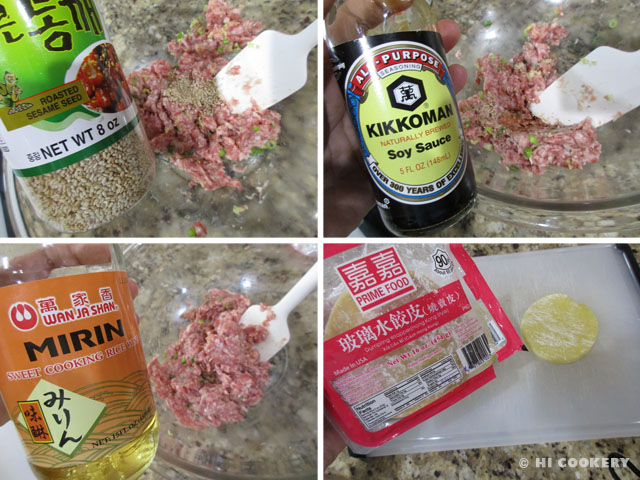
- 1 teaspoon sesame seeds
- ½ teaspoon soy sauce
- 1 teaspoon rice cooking wine (Shaoxing or mirin) or sherry
- round potsticker or won top wrappers
- vegetable or peanut oil for frying
- ¼ cup water
Directions
In a bowl, mix the ground meat with the chopped green onions. Add the garlic and ginger.

Sprinkle in the sesame seeds. Mix in the soy sauce and rice cooking wine to complete the filling.

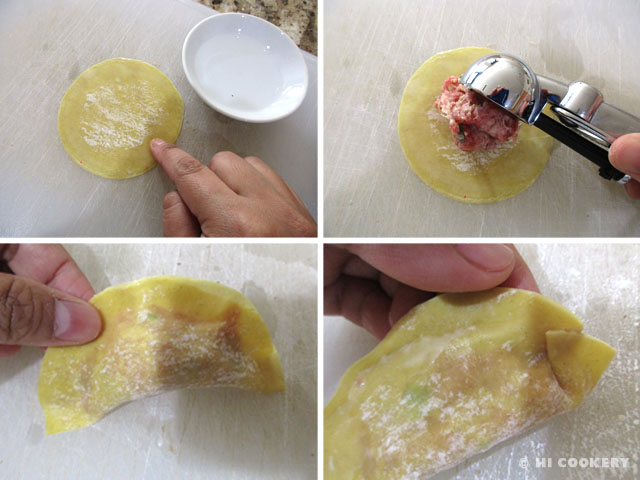
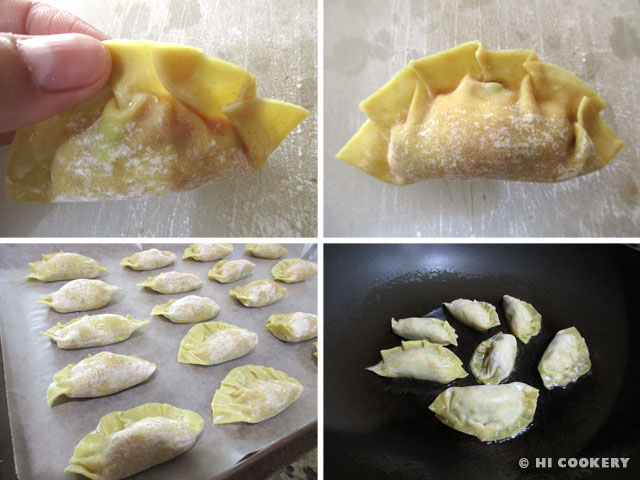
Moisten the edges of the wrapper with a little water. Scoop a tablespoon of filling onto the center. Fold over into a half circle and seal.

Moisten the top outer edge of the wrapper with a little water. Starting on one side, fold a little pleat near the end. Move a little up the wrapper curve and fold a few more pleats. Press down to make sure the pleats are kept folded. Place each potsticker in a single layer on a waxed paper-lined tray and refrigerate until ready to cook.

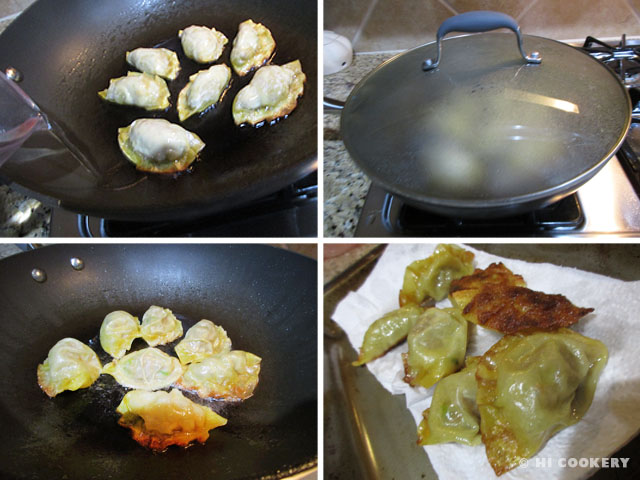
In a skillet, cover the bottom with a very thin layer of vegetable oil. When it is hot, turn down to medium heat and carefully slip the potstickers in the skillet. Avoid overcrowding and overlapping so they do not stick together. Fry until the bottom is slightly browned (about 2-3 minutes). Do not turn over. Pour the water carefully (it will sizzle and splatter a bit). Cover the skillet immediately. Steam until the water has almost evaporated (about 4-5 minutes). Remove the cover and continue heating the potstickers until the filling is cooked through. Transfer the potstickers onto a paper towel to drain. Serve hot with soy sauce or dipping sauce.

For the dipping sauce
- 2 tablespoons soy sauce
- 2 teaspoons rice vinegar
- ½ teaspoon sugar
- 1 clove garlic, minced
- ½ teaspoon sesame oil
- ¼ teaspoon red pepper flakes
Directions
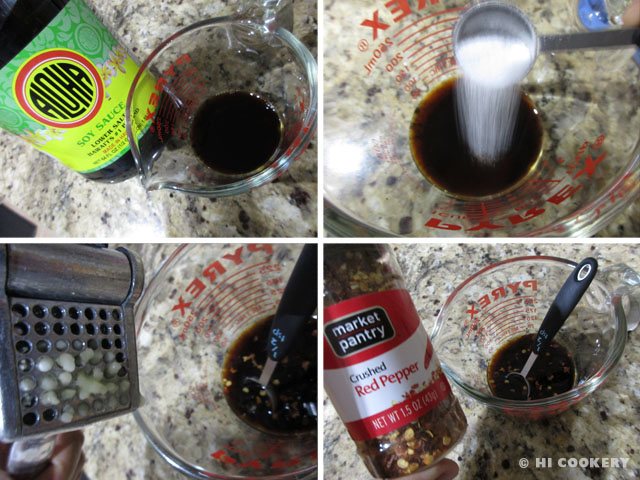
In a measuring cup, combine the soy sauce, rice vinegar and sugar. Stir in the minced garlic.

Add the sesame oil. Sprinkle in the red pepper flakes. Stir until the sugar has dissolved and the sesame oil has been incorporated. Pour into a sauce dish or ramekin. Serve with hot potstickers.

Notes
September 18, 2016
Tiffany Box Petit Fours

September 18: Tiffany & Co. founded in 1837
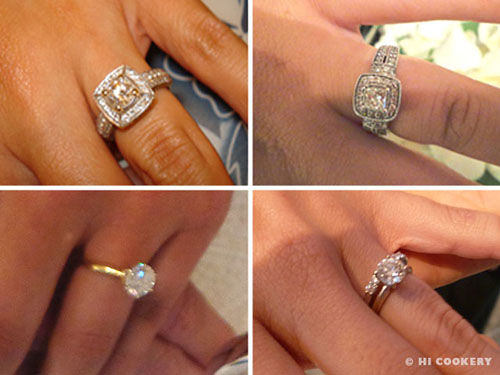
The perfect proposal is considered to be when a young man drops down on bended knee before his lady love and surprises her with a diamond engagement ring, like the popular Tiffany setting. Tiffany & Co. developed the six-prong setting in 1886 to maximize the sparkle of the diamond solitaire by raising it up on its simple, silver band. Many jewelers have copied this setting but only Tiffany & Co. trademarked their design.
While the proposal seems like a dreamy scenario, most often promoted in movies and magazines—and by jewelers!—not everyone follows this tradition, including us. We were both studying for our graduate degrees when we got engaged. Highlander was barely earning any money as an engineering lab assistant to afford a token “worth two months of his salary” (an amount determined by a diamond company for sales and advertising) and Islander just did not care to wear an engagement ring at all. We personally wanted to spend the money on finishing our education and paying for our own wedding (we did get each other beautiful matching Hawaiian heirloom gold bands).
Over two decades later, as marriage sponsors at church, we have listened to many couples share their engagement stories with us. They range from sweet and simple to over-the-top proposals! We have seen our brides wear different styles of engagement rings, too, including the occasional Tiffany setting.
Inspired by Tiffany’s iconic blue package with white bows, we made engagement box petit fours to mark the company’s founding date. These petit fours are perfect for serving at engagement parties and bridal showers.
Congratulations to everyone who recently got engaged. Ring or no ring, we pray that their marriage lasts a lifetime—just like “a diamond is forever”.
Recipe
(Adapted from https://www.youtube.com/watch?v=-B6Xewa4ItQ)
Ingredients
- 1 frozen pound cake loaf (such as Sara Lee brand)
- seedless raspberry jam
- 1 large container vanilla or cream cheese-flavored frosting
- turquoise food coloring gel paste (such as AmeriColor or Wilton brand)
- cornstarch or powdered sugar (to dust work surface)
- white fondant
Directions
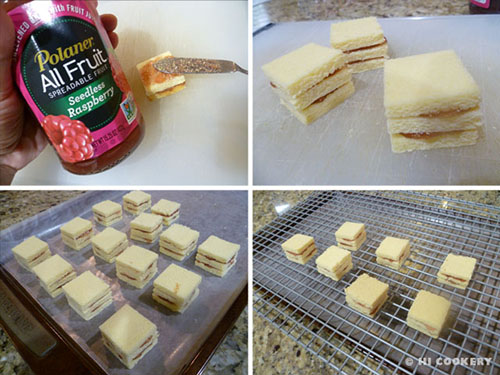
Thaw the pound cake in the refrigerator overnight but keep it chilled for easier slicing. Slice down the pound cake about ¼ – 1/3 inches thick. Discard the ends. Using a 1 ½-inch square cookie cutter, cut out two squares per pound cake slice.
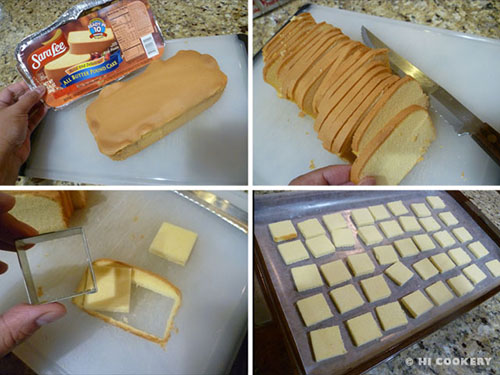
Stir the seedless raspberry jam in the jar until smooth. Spread a tiny bit of jam on one pound cake square for the bottom of the petit four. Top with another square for the middle. Spread a tiny bit of jam on the middle square and top it off with a last square for a total of three stacked squares. Chill to set in the refrigerator for at least half an hour. Line a jelly roll pan with waxed paper to catch the frosting underneath. Place a wire rack over the prepared pan. Put a few stacked pound cake squares on the wire rack.

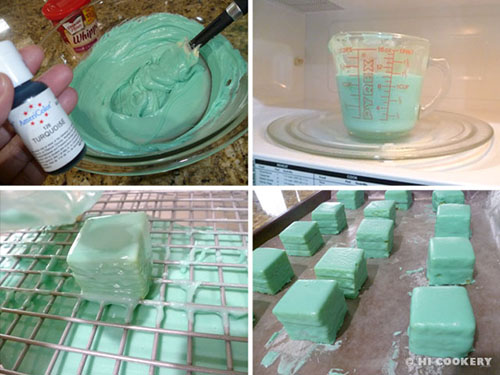
Tint the frosting with a little food coloring gel paste to get the desired color of “Tiffany Blue”. Stir well. Place half the amount of frosting into a microwavable measuring cup. Heat on high for 15-20 seconds. It should be slightly runny and thick but not too thin. If the frosting is too hot and runny, let it cool for a few minutes to a pourable consistency. Stir until smooth. Pour the frosting over the top of the squares, moving around the edges to allow drippings on all sides. Use an angled spatula on the bottom of the square to transfer the petit four to another pan or plate lined with waxed paper. Scrape up the frosting drippings on the waxed paper and put back in the microwavable measuring cup. Reheat and reuse for the remaining petit fours. Chill all frosted squares in the refrigerator until set.

Dust a clean work surface with cornstarch or powdered sugar before rolling out fondant (this prevents it from sticking). Knead fondant and roll out thinly (about 1/16 inch). Use a pizza cutter or fondant ribbon slicer to cut strips 1/8 inch wide. Brush a fondant strip with a little water and apply to the petit four. Repeat with the other strip for a cross over. Trim the edges with a knife. Refrigerate while making the bows.
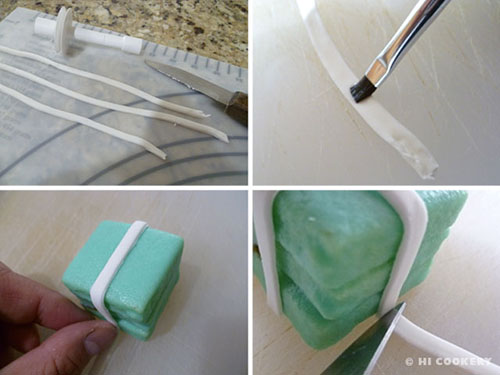
Dust the silicone bow mold with cornstarch or powdered sugar. Knead a little fondant and press into the cavities of the mold. Remove the bows and let them air dry for at least half an hour. Brush a little water on the back of the bow and adhere to the center of the petit four. Chill until ready to serve.

Notes
- We used a bow mold from First Impressions Mold company. Each bow measures 1 x 1/2 x 1/8 inches.
- Try our Tiffany macaron recipe for another sweet treat.
- Islander attended a Tiffany-themed bridal shower brunch this past summer. It was fun dressing up in a little black dress and a pearl necklace, just like actress Audrey Hepburn did in the 1961 movie, “Breakfast at Tiffany’s”. For this event, she helped her friend Margarita F. at M5 Cake finish putting the criss-cross strips on the Tiffany box mini cakes.

- Change the colors of the poured frosting and fondant for other party presents petit fours.

September 15, 2016
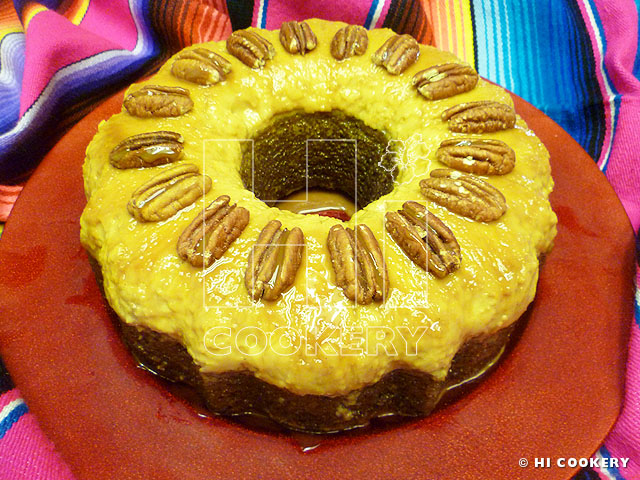
Choco-flan
September 15-October 15: Hispanic Heritage Month
At a cake club meeting that Islander had attended, one of the members brought in a curious cake called choco-flan. It was a doubly delicious dessert of chocolate and custard. It is also popular among her Mexican friends whose country is known for xocolatl y flan. Islander added Texas’ state nut, pecans, to decorate the top of the cake for a Tex-Mex taste. Thanks to her Mexican friends for introducing this recipe to us. In their honor, and as an homage to all our Hispanic friends, we made this cake in observance of Hispanic Heritage Month. Muchas gracias, amigas.
Recipe
Inspired by nuestras amigas en San Antonio, Tejas
For the cake
- 1 bottle or can of dulce de leche or cajeta (caramel), divided use
- 1 box chocolate cake mix (may use devil’s food, triple chocolate fudge or other favorite chocolate cake mix)
- 1 cup water
- ½ cup oil
- 3 eggs
For the flan
- 1 can (14 ounces) sweetened condensed milk
- 1 can (12 ounces) evaporated milk
- 4 eggs
- 1 teaspoon Mexican vainilla (vanilla)
Directions
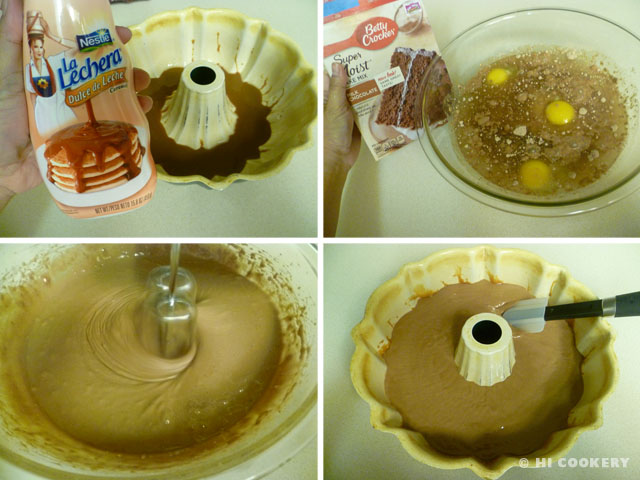
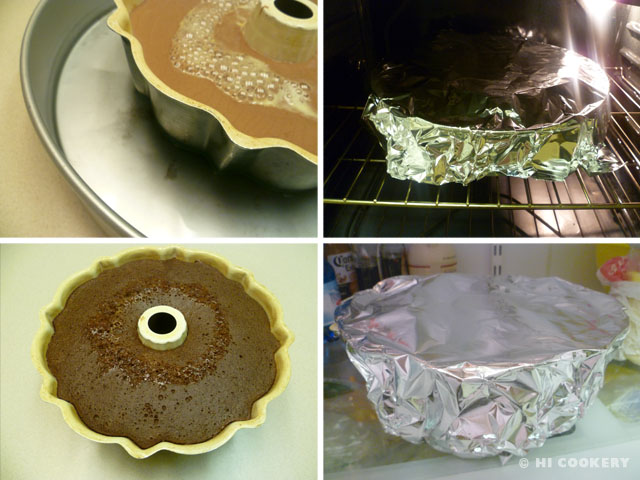
Grease a 12-cup bundt pan. Then pour about a cup of caramel to coat the sides and bottom. Set aside. Prepare the cake mix as directed on the box by combining the cake mix with water, oil and eggs and blending into a smooth batter. Pour the cake batter over the caramel. Set aside.
Make the flan by mixing the sweetened condensed milk, evaporated milk, eggs and vanilla.
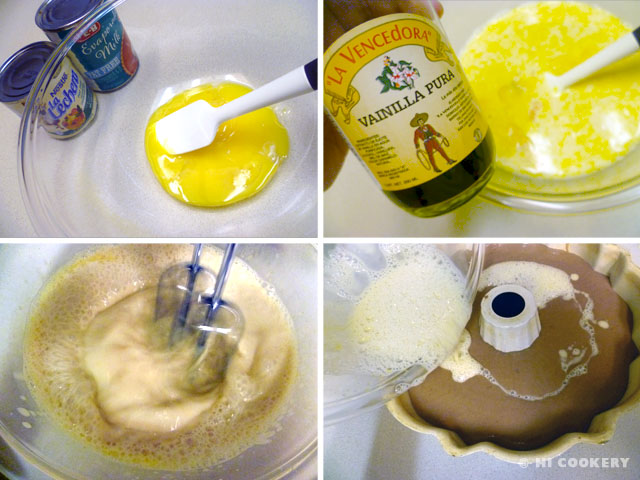
Pour the flan mix over the cake. It will sink to the bottom. Place the bundt pan in a larger pan. Pour boiling hot water in the larger pan up to the middle of the sides of the bundt pan to make a “water bath”. Mist a piece of foil with cooking spray and cover the bundt pan with the sprayed side down (this will prevent the risen cake from sticking to the top of the foil). Bake in a preheated oven at 350 degrees F for 50-60 minutes, testing the cake for doneness. Remove from the oven and let cool to room temperature. Place in the refrigerator to allow the flan to chill and solidify.
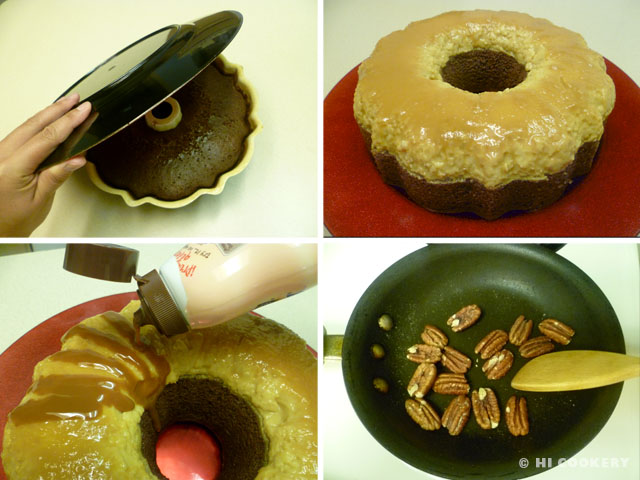
Take out from the refrigerator and carefully invert on a plate. Drizzle more caramel on top of the choco-flan and let it drip down the middle hole and sides. Toast whole pieces of pecans by heating the nuts in a small skillet, being careful not to burn. Cool the nuts then place them decoratively on top of the choco-flan. Refrigerate. Slice and serve.
Notes
Next Page »