Snow Gentlemen and
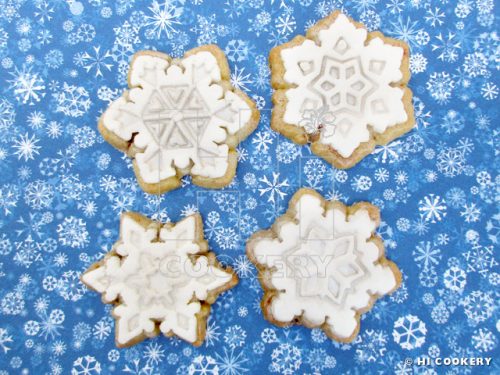
Snowflake Cookies

December 4: National Cookie Day
‘Tis the season to be baking! As Christmas and the winter season approach, we made some snowflake cookies with bonus snow gentlemen (no top hat, just a cute little bowtie). The dough is flavored with festive crushed candy canes to give the cookies some crunch, color and coolness from the peppermints. Snowflake cookies and snow gentlemen would be picture perfect at holiday parties and be a scrumptious snack, especially on National Cookie Day and throughout the winter season.
Recipe
(Adapted from Sweetopia)
For the cookie dough
- 1 cup (2 sticks) butter, unsalted, room temperature
- 1 cup sugar
- 1 egg
- 1 teaspoon vanilla extract
- 2 ½ cups flour
- ½ teaspoon salt
- 1/3 cup crushed candy cane/peppermint candies
Directions
In a mixing bowl, cream the butter with the sugar. Beat in the egg. Add the vanilla. In a separate bowl, combine the flour and salt.

Gradually add the dry ingredients to the wet ingredients. Mix until a sticky dough is formed. Fold in the crushed candy cane, being careful not to overmix of the dough will turn pink. Roll out dough out into a ball and divide in half. Flatten each ball into a circle between two pieces of waxed paper.
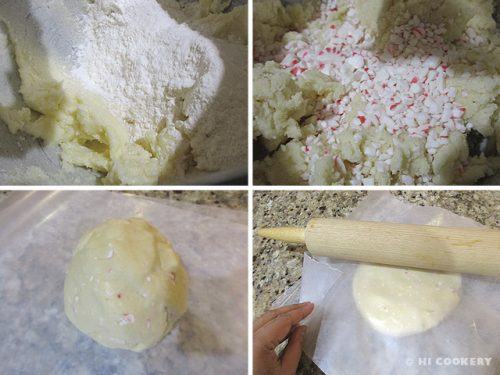
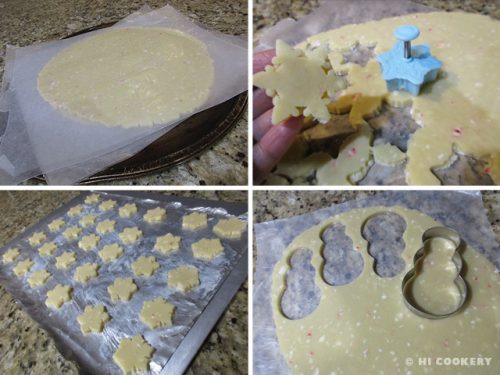
Use a rolling pin to roll to a thickness of ¼ inch. Stack the rolled dough on top of each other and refrigerate until firm (about an hour). Take out one of the flattened dough from the refrigerator. Cut into shapes with cookie cutter. Place on a greased baking sheet two-inches apart.
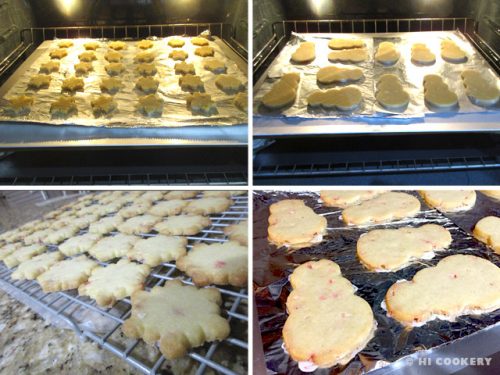
Bake in a preheated oven at 350 degrees F for 10-12 minutes or until the edges start to brown. Remove from the oven and transfer to a wire rack to cool completely. Remove hardened bits of candy from the edges and finish decorating.
For the snowflake fondant decorations
- Powdered sugar or cornstarch (for dusting the work surface)
- White fondant
- Water
- Luster dust (pearl and silver)
Directions
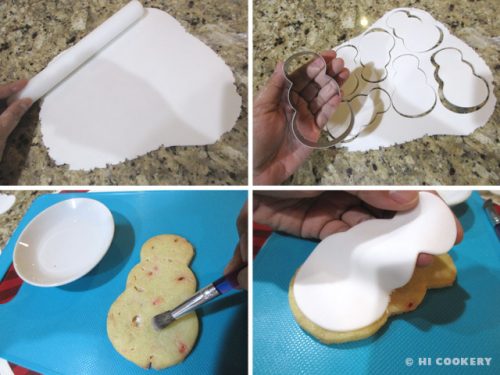
Dust a clean work surface with a little powdered sugar or cornstarch to prevent the fondant from sticking. Knead some white fondant until pliable. Roll out very thin (about 1/32 inch), being careful not to tear the fondant. It needs to be very thin so that the snowflake cookie stamp leaves a good impression. Dust a little powdered sugar or cornstarch on the cookie cutter to prevent the fondant designs from sticking. Cut out shapes and release with plunger. Keep covered in a plastic zipper top bag to prevent from drying out.

Brush water on a snowflake cookie. Press a matching fondant piece on top. Repeat with all other cookies. Dry brush some luster dust over the fondant. Store unstacked or between sheets of waxed/parchment paper or napkins.

For the snow gentlemen cookies
- Powdered sugar or cornstarch (for dusting the work surface)
- Fondant (white, black or dark chocolate, blue and orange)
- Water
Directions
Dust a clean work surface with a little powdered sugar or cornstarch to prevent the fondant from sticking. Knead some white fondant until pliable. Roll out very thin (about 1/16 inch). Cut out snowperson shapes and keep covered in a plastic zipper top bag to prevent from drying out. Brush water on a snowperson cookie. Press the fondant piece on top, gently stretching to fit the edges as necessary. Repeat with all other cookies.
Knead some black or dark chocolate fondant until pliable. Roll out very thin (about 1/16 inch). Use round tip #7 or #8 to punch out holes for the eyes and buttons. Dot a little water with a thin brush on the white fondant and position the eyes with a toothpick.

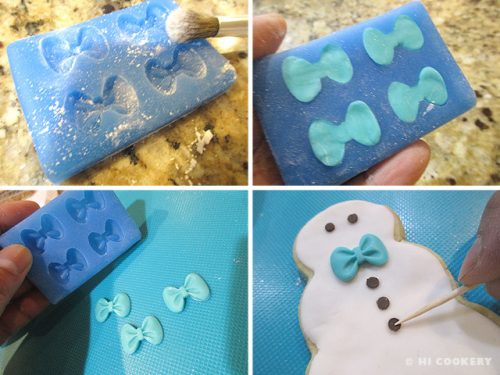
Dust the bowtie/ribbon mold with a little powdered sugar or cornstarch to prevent the fondant from sticking. Knead some blue fondant until pliable. Press into the bowtie/ribbon mold. Flatten the back or trim away the excess. Unmold. Add a little water with a thin brush on the white fondant to position the bowtie. Finish adding the buttons in the same manner as the eyes.
Knead some orange fondant until pliable. Roll into a small ball. Shape into a cone/carrot and flatten the bottom. Attach to the white fondant with a little water. Store unstacked until ready to serve on a platter.

Notes
- Highlander had gifted Islander with the mini snowflake cookie cutter plungers as a Christmas stocking stuffer last year. There were four snowflake designs (and other seasonal shapes) at Michael’s craft stores for $1 each.
- Search our blog for other cookie recipes for holiday cookie swaps/exchanges and seasonal parties.