Fried Shrimp Dumplings
December 20: National Fried Shrimp Day
Yum yum, dim sum! Fried shrimp dumplings with sweet mayonnaise dipping sauce are Islander’s favorite, among her other top choices of siu mai (pork hash), har gao and char siu so.
Dim sum is literally translated as “touch the heart”. It is not often that we eat at a dim sum restaurant, unless it is for a special occasion or when Phyllis S., our American Chinese friend visits us from San Antonio, Texas (she is a Hawaii ex-pat like Islander). Then we eat dim sum to our heart’s content!
Islander and Phyllis try to make dim sum, too. They make a lot of won ton, egg rolls, manapua (char siu bao), shrimp balls, fried shrimp dumplings, etc., and take home half of the work they do together so they can enjoy the food later with their families. This has become their friendly motto:
Even though we’re far apart…our dim sum will always “touch the heart”!
Make, cook and eat dim sum with a beloved friend, particularly fried shrimp dumplings on National Fried Shrimp Day.
Recipe
For the fried shrimp dumplings
- 1 pound shrimp, uncooked
- 2 egg whites
- 2 tablespoons olive oil
- 1 teaspoon sesame oil
- salt and white pepper to taste
- round won ton wrappers
- water for sealing the wrappers
- oil for frying
Directions
Wash, dry, remove shells and devein the shrimp. Mince finely and place in a mixing bowl. Stir in the egg whites and olive oil.

Stir in the sesame oil. Salt and pepper to taste. Mix everything well, cover and refrigerate for at least an hour to allow the flavors to develop and ingredients to stick together.

Place the a tablespoon of filling in the center of a round won ton wrapper. Moisten finger from the water bowl and trace around the edges. Fold and pleat the edges.

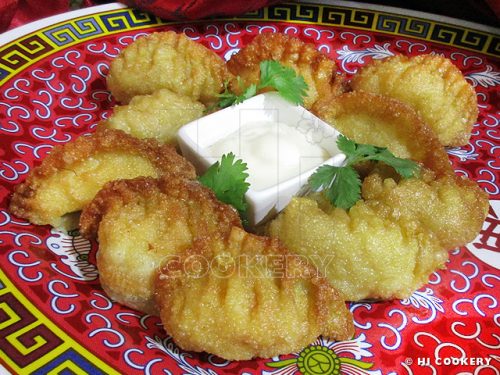
Deep fry the shrimp in hot oil until golden brown. Drain on paper towels. Serve hot with sweet mayonnaise dipping sauce or other favorite sauce (soy, chili or hot sauce).

For the mayonnaise dipping sauce
- ¼ cup mayonnaise
- 2 tablespoons sweetened condensed milk
- 1 teaspoon honey
Directions
In a measuring cup or small bowl, stir together the mayonnaise, milk and honey. Transfer to a dipping saucer and serve with hot fried shrimp dumpling.

Notes
- Cover the won ton wrappers with a moist cloth or paper towel when not using to prevent them from drying out.
- We hope Phyllis S. visits more often so we can eat dim sum every day while we are together!
- Make dim sum for the lunar new year or for Asian-inspired tea parties.
- Find other fried shrimp recipes on our blog for National Fried Shrimp Day.