Elmo Candy

February 3: Elmo’s Birthday
Happy birthday to Islander’s favorite furry friend—Elmo! She adores the Sesame Street character so much that she was inspired to try a candy decoration project to mark her muse’s special day. It is a simple sugar arts technique that involves tracing and flooding over a pattern. The finished candy piece may be eaten as is or used as a cake decoration.
Elmo was a simple pattern with a few candy melt colors that Islander had on hand for her first candy project. Other clipart or coloring page patterns and chocolate or candy melt colors may be used—the possibilities are endless for a fun and personalized project. But for today, enjoy an edible Elmo on his birthday.
Recipe
Ingredients
- Black (or dark chocolate) candy melts
- Red candy melts
- Orange candy melts
- White (or white chocolate) candy melts
Directions
Print out a clipart or coloring page of Elmo. Put the image on a cake board, cardboard or cutting board. Tape waxed paper over it. Melt the black or dark chocolate candy melts. Let cool slightly. Fill a piping bag outfitted with Wilton tip #3. Trace the outline of Elmo, flooding the mouth area. Refrigerate for a few minutes until the candy is set.
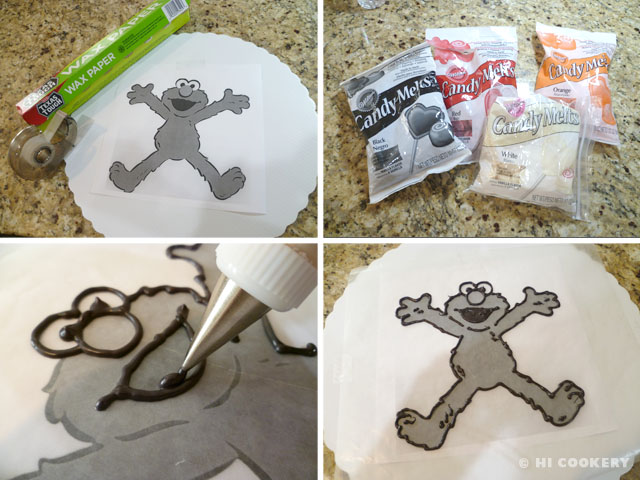
Melt the red candy melts. Let cool slightly. Fill a piping bag outfitted with Wilton tip #3. Flood the body area. Do the same for the nose using the orange candy melts.

Melt the white chocolate candy melts. Let cool slightly. Fill a piping bag outfitted with Wilton tip #3. Flood the eye area. Refrigerate for a few minutes until the candy is set.

Use the remaining melted white chocolate candy melts to trace all over Elmo’s body and flood the area completely. This makes the overall candy sturdier. Go ¼-inch past the edges with an outer outline (optional). Refrigerate for a few minutes until the candy is set. Remove the tape from the wax paper. Turn the hardened candy Elmo over on the flat surface. Carefully peel away the waxed paper. Cover with plastic wrap until ready to serve or decorate a cake.
