05 May


Midori (Japanese Melon

Liqueur) Cake

April 29/May 4: Greenery Day (Japan) [みどりの日Midori no Hi]

We missed Greenery Day in Japan by just one day when we flew into the “Land of the Rising Sun” in 2019 for Highlander’s belated kanreki. But we arrived in time for Boys’ Day (May 5) and the culmination of Golden Week.  As spring has already sprung, the pink cherry blossoms have given way to all the natural green beauty of the country.

Greenery Day in Japan began on April 29, 1948, to celebrate the birthday of the emperor. In 1989, the Emperor’s Birthday was renamed as Greenery Day. In 2007, the date was moved from April 29 to May 4. The whole week includes holidays commemorating the Emperor’s Birthday, Constitution Day, Greenery Day and Boys’ Day (also known as Children’s Day).

We celebrated our own Greenery Day at home in Texas and reminisced about our trip to Japan by making a green cake. We even used a Japanese melon liqueur called midori to give it a little culture and color! And we ate a few slices of midori cake while we drank green (matcha) tea.

Make a midori cake for tea time and on Japanese Greenery Day.

Recipe

(Adapted from Food.com)

Ingredients

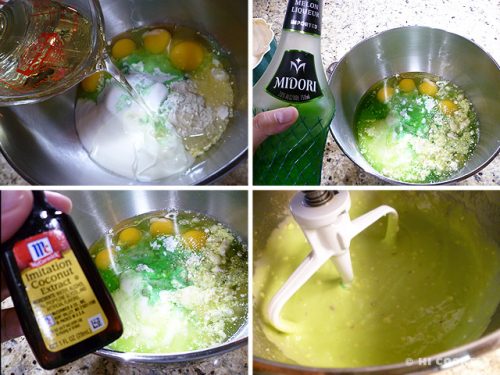
  • 1 box yellow cake mix
  • 1 small (3 ½ ounce) instant pistachio pudding mix
  • 4 eggs
  • ½ cup plain yogurt
  • ½ cup vegetable oil
  • ¾ cup Midori (melon liqueur)
  • ½ teaspoon coconut extract or flavor

Directions

In a mixing bowl, combine the cake mix, pudding mix, eggs and yogurt.

Stir in the oil, Midori and coconut flavor. Mix until smooth.

Pour into a greased bundt pan. Bake in a preheated oven at 350 degrees F for 40-45 minutes. Remove from the oven and cool completely. Overturn cake onto a plate or cutting board. Slice and serve.

Notes

  • Feel free to add a few drops of green food coloring to the batter to boost the hue of the Midori cake.
  • Sprinkle the top of the bundt cake with powdered sugar for a prettier presentation (optional).

Homemade Butter

May 1: National Butter Day

When Islander was in elementary school learning about food and dairy products, she and her classmates were divided into little groups and given jars of cream. Each student in the group would take turns shaking the jar until parts of the cream solidified into butter. After draining the buttermilk, everyone enjoyed spreading butter onto crackers and eating snacks together. It was a lot of fun and energetic way to learn about making butter from scratch (she wonders how she would have gotten through that lesson now since she has developed lactose intolerance in college; she takes pills for it).

We decided to make butter at home—after our inattentiveness to beating heavy whipping cream turned out to look like a mess of light yellow wet cheesy curd. But that was just the butterfat separating from the buttermilk. We continued beating it further, then straining the liquid, and came out with real butter. A little Hawaiian sea salt and more beating gave us a creamy, spreadable, fresh and tasty butter. What a deliciously yummy mmmmm-mistake!

Now we overbeat the cream on purpose so we can have some homemade butter. Instead of shaking the cream in jars (or using a traditional churn), we simply let our Kitchenaid mixer whip up a batch of butter and buttermilk. This is a fun experiment with kids and a delicious way to observe National Butter Day.

Recipe

Ingredients

  • 2 cups (1 pint) heavy whipping cream, very cold
  • ice water
  • ½ teaspoon sea salt

Directions

In a cold mixing bowl with cold beaters (such as the Kitchenaid balloon whisk), pour the cream. Beat on low for a minute, then increase to medium speed and whip until soft peaks form. Increase the speed to high and beat for another 3-5 minutes.

Scrape the sides and cover the mixer with a towel or splash guard. Beat on high for another 3-5 minutes until the solids separate from the liquid. Place a strainer over a bowl and pour the liquids out from the butter; reserve the buttermilk for another use.

Transfer the solid butter to another bowl and squeeze out more liquids by rinsing with ice water until clear. Return butter to mixer and change to the whisk to the paddle attachment. Add sea salt (or other flavors) and beat until creamy. Store in a covered container for two weeks.

Notes

  • After straining the butter from its milk, return to the mixer and whip with some herbs, citrus zest or honey for different flavored butters.
  • Spread fresh homemade butter on bread/biscuits/toast/scones, use in recipes or make buttercream frosting.

Double Ginger Scones

May 30: National Scone Day

Highlander’s Mum pronounces “scone” like the word “con” but we say it like “cone”. Either pronunciation is acceptable—and it also depends on the region, according to studies and surveys.

Highlander’s Mum is from Ontario, Canada. Her father (Highlander’s grandfather) emigrated from Scotland, where scones originated. Scone is pronounced like “con” there and in the majority of Great Britain, Australia, New Zealand, South Africa and Canada. In the Republic of Ireland, Italy and USA, people pronounce scone like “cone”.

Inspired by the double pronunciation of scone, we made double ginger scones for National Scone Day. This recipe has both crystallized ginger and ground ginger as ingredients, which make this scone a spicy sweet treat for teatime.

Now, how do you pronounce scone?

Recipe

(Adapted from Tea Time Magazine)

Ingredients

  • 2 cups flour, all purpose
  • ½ cup sugar, granulated white
  • 2 teaspoons baking powder
  • 1 teaspoon ground ginger
  • ½ teaspoon salt
  • 4 tablespoons (½ stick) butter, cold salted, cut into small pieces
  • 3-5 tablespoons crystallized ginger, chopped finely
  • 1 egg yolk
  • ¾ cup almond milk, unsweetened
  • sliced or slivered almonds

Directions

In a large bowl, combine the flour, sugar and baking powder, ground ginger and salt. Cut in the cold butter and mix into the flour with a pastry blender until it resembles coarse crumbs.

Blend in three tablespoons of chopped crystallized ginger. In a separate cup, beat the egg yolk with almond milk. Pour in the milk mixture into the flour and blend until smooth, being careful not to overwork the dough. Turn out dough onto a clean, slightly floured surface. Knead four or five times (if too dry, add a little more almond milk mixture; if too wet, add a little more flour).

Roll out to ¼ inch thickness and cut with a 2-inch round fluted cutter, re-rolling the scraps as necessary. Place scones two inches apart on a baking sheet lined with parchment paper. Top with extra chopped crystallized ginger and almonds. Bake in a preheated oven at 350 degrees F for 20 minutes or until golden brown, testing with a toothpick for doneness. Remove from the oven and transfer to a wire rack. Serve warm.

 Notes

  • We like to get our ginger overload by drinking lemon ginger tea with double ginger scones.
  • Search our blog for other scones recipes.

« Previous PageNext Page »