Halloween Ribs

Halloween Ribs

October 31: Halloween

Before indulging in sweets tonight, eat something savory-scary: Halloween ribs! This main dish is meaty and messy and makes for a disgusting-looking but delicious dinner. If hosting a Halloween party, guests will gross out on this gruesome grub.

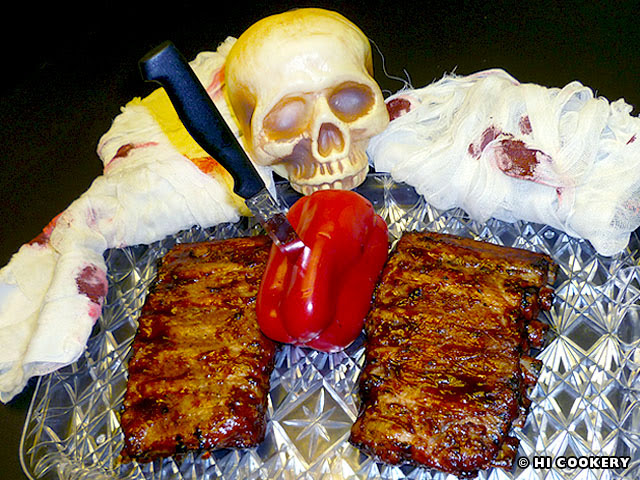
Preparation of the ribs is simple but the presentation can be spectacularly spine-chilling! Our version is basic—just pork spareribs smothered in our favorite flavor of BBQ sauce with a fresh red bell pepper, accessorized with a knife, plastic skull and bloody cloth. Add cold cuts to the skull (flaying flesh) and mini-sausages (intestines) for an all-out appalling yet appetizing and bloody good buffet.

Cook a creative yet creepy food—ribs—for a Happy Halloween!

Recipe

Ingredients

 Directions

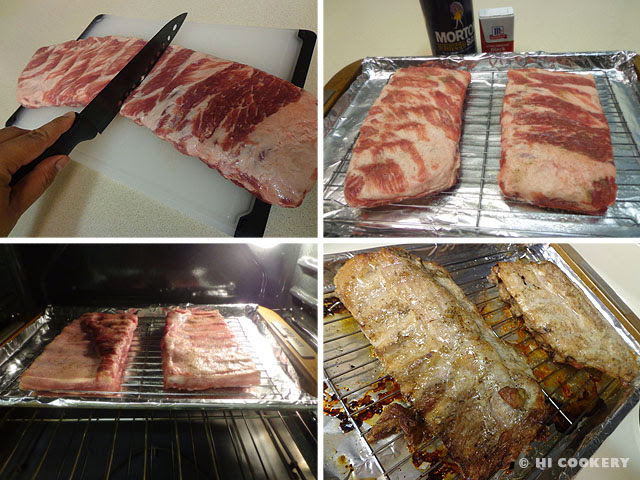
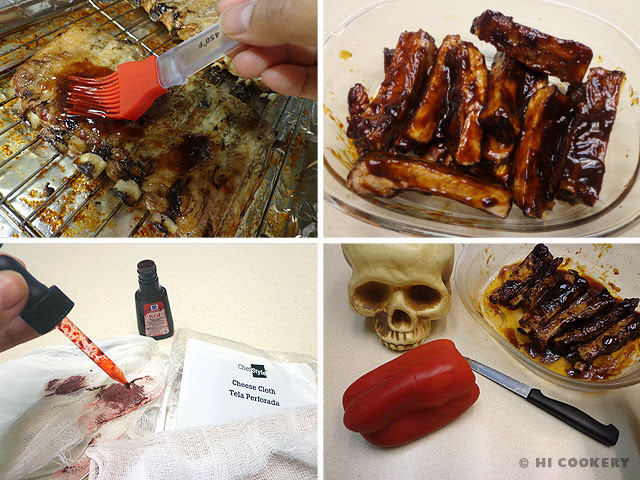
Cut the ribs in half. Season them with salt and pepper. Bake the ribs in a preheated oven at 400 degrees F until cooked. Half an hour before they are done, remove from the oven. Baste one side of the ribs with the sauce. Return to the oven and cook for another 15 minutes. Remove from the oven and baste the other side of the ribs with the sauce. Return to the oven and finish another 15 minutes.

Halloween Ribs

Arrange the ribs on a platter, placing a rack on opposite sides of each other (or slice between the bones and position them like racks). In between them, put a red bell pepper in the top center. Stick a sharp knife in the red bell pepper. Decorate around the platter with cheesecloth that has been stained with red food coloring. Place the platter on a table and position a plastic skull above the red bell pepper. Serve while the ribs are still hot.

Halloween Ribs

Notes

  • If using one rack of pork ribs, cut in half to make a shorter rib cage. We used St. Louis-style spareribs instead of baby back ribs for this recipe because they were larger and proportionate to the size of the plastic skull.
  • If serving more guests, use two racks of ribs for a longer rib cage. Although presentation is key, the ribs may be pre-cut and arranged on a platter for an easier self-serve buffet.
  • Optional: Below the bell pepper and under the spareribs, scatter some sausages (such as Lit’l Smokies) in BBQ sauce to look like intestines.
  • Optional: Cover a clean plastic skull with cold cuts (like deli-style, thin-sliced ham, roast beef, etc.) to look like decaying skin.
  • A plastic or toy knife may be used in place of the real sharp one for safety issues.

Witch Hat Cone Cookies

Witch Hat Cone Cookies

October 31: Halloween

Islander joined a local cake coven club so she could learn more about and practice witch sugar craft. At its monthly meeting every October, which has a Halloween theme, members bring in desserts to share decorating ideas.

For this particular post, we wanted to “hocus-focus” on a stereotypical witch’s most fashionable accessory—her pointy hat. Islander saw two styles at the Halloween meeting. One version included a candy-filled sugar cone sprayed with black color mist and set on a small, round chocolate cookie base. Another (easier) version featured Hershey’s Kisses on top of the backsides of Keebler Fudge Stripes Cookies.

As a Blair witch project, Islander adapted the idea and used ice cream sugar cones and waffle cookies (same textures with a frillier-brimmed hat). The trick to making this treat is patience in “painting” with chocolate. The result is a festive food and decorative dessert for Halloween!

Recipe

Ingredients 

  • Round waffle cookies (Italian pizzelles)
  • Ice cream sugar cones
  • Semi-sweet chocolate, melted (or Wilton brand black candy melts)
  • Assorted lightweight Halloween-themed sweets (we used gummie worms, but feel free to fill the cones with candy corn, mini M&M’s, seasonal sprinkles or chocolate chips)
  • Yellow, orange, green or purple tube frosting
  • Pumpkin candies

Directions

On large baking sheets lined with waxed paper, place a dozen pizzelles spaced apart.  In a medium bowl, melt the chocolate. Stir until smooth. Dip the open end of the ice cream sugar cone in the melted chocolate. Carefully fill with a little candy.

Witch Hat Cone Cookies

Position a pizzelle to cover the cone and invert it back on the baking sheet. Repeat with all the cones and let the chocolate set as a seal. Using a food safe brush, paint the chocolate on the cone and pizzelle. Cool completely to set.

Witch Hat Cone Cookies

Use the tube frosting with a small decorating tip to make a hatband where the cone and pizzelle are attached. Add a little tube frosting to secure the pumpkin candy in place. Keep the witch hat cone cookies cool until ready to serve.

Witch Hat Cone Cookies

Notes

  • Search our blog for other Halloween recipes.
  • Happy Halloween to all our blog readers!

Vampire Bite Cookies

Vampire Bite Cookies

October 31:
Halloween

Bite into bright, blood-red cookies that look like luscious vampire lips. The sweet sugar cookies have a hint of cinnamon and the fondant fangs contrast the color of the chewy chocolate caramel candy. These cute cookies are a distinctively delectable Dracula-themed dessert. Bake a batch of vampire bite cookies for scary movie nights and for Halloween parties.

Recipe

(Adapted from Bright Ideas)

Ingredients

  • 1 ½ cups flour
  • ¾ teaspoon baking soda
  • ½ teaspoon cinnamon
  • ½ cup (1 stick) butter
  • ½ cup brown sugar
  • 1 egg
  • Red food coloring (we used Americolor brand Super Red food color paste)
  • Red sugar crystals (we used Cake Mate brand)
  • Mini chocolate-covered caramel candies (Riessen or Milky Way)
  • White/vanilla fondant (we used a Satin Ice sample)

Directions

Unwrap all the chocolates and set aside. In a mixing bowl, combine the flour, baking soda and cinnamon. In another bowl, cream the butter with the sugar. Beat in the egg.

Vampire Bite Cookies

Gradually add the flour mixture and blend until smooth. Tint with red food coloring. Shape the dough into a ball. Cover and refrigerate for at least two hours.

Vampire Bite Cookies

Remove the dough from the refrigerator and divide in half. Place the other half of the dough back in the refrigerator while working on the other half. Shape into a flat disc. Place between two sheets of waxed paper. Roll out to ¼ inch thick. Use a lip cookie cutter to cut out shapes (or use a knife to free-form lip shapes). Refrigerate the lip shapes while working on the other half of the dough. Repeat by re-rolling dough scraps, if necessary. Sprinkle red sugar crystals on the lip-shaped cookies. Place on a cookie sheet lined with parchment paper. Bake about 7-8 minutes (do not overbake or the cookies will be too hard) in a preheated oven at 375 degrees F.

Vampire Bite Cookies

Remove from the oven and quickly press a mini chocolate caramel candy in the center of the cookie. Place cookies on a wire rack to cool completely.

Vampire Bite Cookies

Roll out a small piece of white/vanilla fondant. Slice tiny triangles into fangs. Use a food-safe brush and use water as an adhesive on one side of the fondant fangs.

Vampire Bite Cookies

Position two fangs on top of the chocolate. Arrange cookies on a platter and serve. Yield: Varies on the size of the lip-shaped cookie cutter (we used a 2-inch cutter, which yields about 2 ½ – 3 dozen cookies).

Vampire Bite Cookies

Notes

  • For another Dracula-theme dessert, make Vampire Bite Cupcakes.
  • The cookies tend to puff up slightly when baking. For a more defined lip shape, outline the edges with red gel or cookie icing.
  • If fondant is not available to make the fangs, simply substitute white icing and pipe sharp teeth shapes over the candy.
  • Thanks to Margarita F. of M5 Cake for letting us borrow the lip cookie cutter for this blog recipe post.