Witch Hat Cone Cookies

Witch Hat Cone Cookies

October 31: Halloween

Islander joined a local cake coven club so she could learn more about and practice witch sugar craft. At its monthly meeting every October, which has a Halloween theme, members bring in desserts to share decorating ideas.

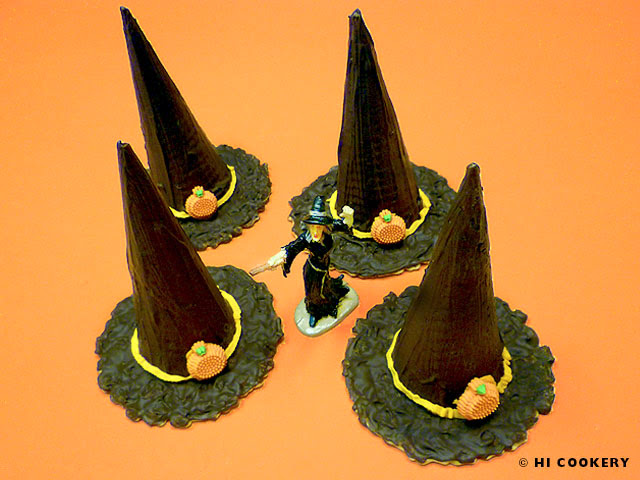
For this particular post, we wanted to “hocus-focus” on a stereotypical witch’s most fashionable accessory—her pointy hat. Islander saw two styles at the Halloween meeting. One version included a candy-filled sugar cone sprayed with black color mist and set on a small, round chocolate cookie base. Another (easier) version featured Hershey’s Kisses on top of the backsides of Keebler Fudge Stripes Cookies.

As a Blair witch project, Islander adapted the idea and used ice cream sugar cones and waffle cookies (same textures with a frillier-brimmed hat). The trick to making this treat is patience in “painting” with chocolate. The result is a festive food and decorative dessert for Halloween!

Recipe

Ingredients 

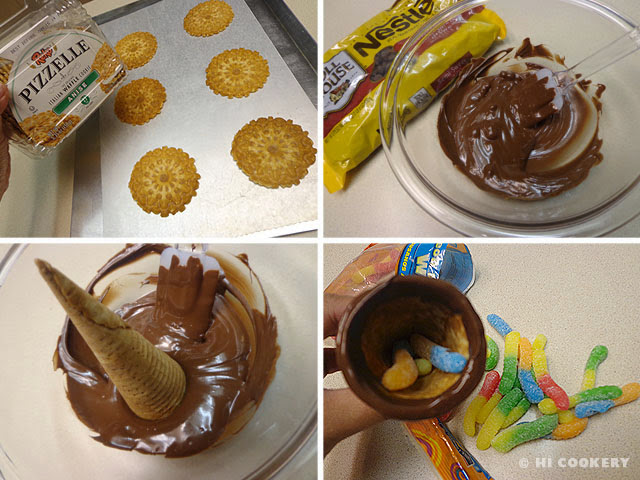
  • Round waffle cookies (Italian pizzelles)
  • Ice cream sugar cones
  • Semi-sweet chocolate, melted (or Wilton brand black candy melts)
  • Assorted lightweight Halloween-themed sweets (we used gummie worms, but feel free to fill the cones with candy corn, mini M&M’s, seasonal sprinkles or chocolate chips)
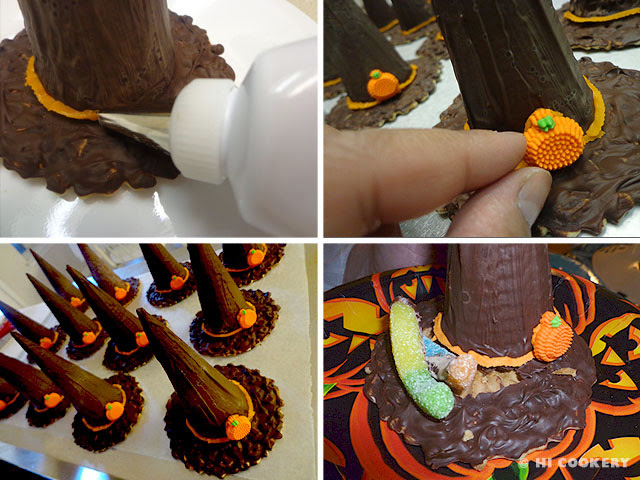
  • Yellow, orange, green or purple tube frosting
  • Pumpkin candies

Directions

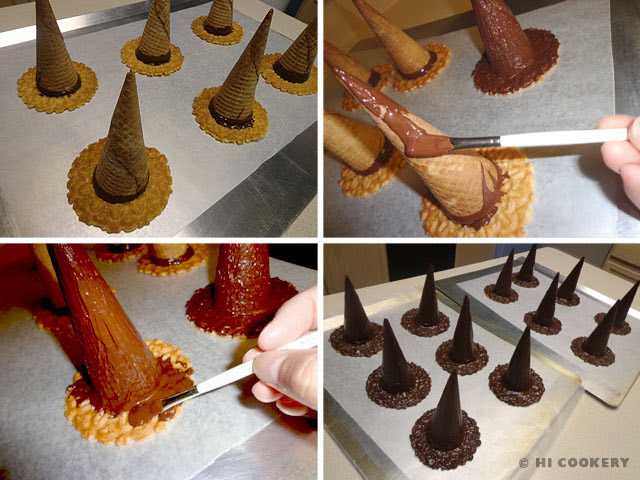
On large baking sheets lined with waxed paper, place a dozen pizzelles spaced apart.  In a medium bowl, melt the chocolate. Stir until smooth. Dip the open end of the ice cream sugar cone in the melted chocolate. Carefully fill with a little candy.

Witch Hat Cone Cookies

Position a pizzelle to cover the cone and invert it back on the baking sheet. Repeat with all the cones and let the chocolate set as a seal. Using a food safe brush, paint the chocolate on the cone and pizzelle. Cool completely to set.

Witch Hat Cone Cookies

Use the tube frosting with a small decorating tip to make a hatband where the cone and pizzelle are attached. Add a little tube frosting to secure the pumpkin candy in place. Keep the witch hat cone cookies cool until ready to serve.

Witch Hat Cone Cookies

Notes

  • Search our blog for other Halloween recipes.
  • Happy Halloween to all our blog readers!

Vampire Bite Cookies

Vampire Bite Cookies

October 31:
Halloween

Bite into bright, blood-red cookies that look like luscious vampire lips. The sweet sugar cookies have a hint of cinnamon and the fondant fangs contrast the color of the chewy chocolate caramel candy. These cute cookies are a distinctively delectable Dracula-themed dessert. Bake a batch of vampire bite cookies for scary movie nights and for Halloween parties.

Recipe

(Adapted from Bright Ideas)

Ingredients

  • 1 ½ cups flour
  • ¾ teaspoon baking soda
  • ½ teaspoon cinnamon
  • ½ cup (1 stick) butter
  • ½ cup brown sugar
  • 1 egg
  • Red food coloring (we used Americolor brand Super Red food color paste)
  • Red sugar crystals (we used Cake Mate brand)
  • Mini chocolate-covered caramel candies (Riessen or Milky Way)
  • White/vanilla fondant (we used a Satin Ice sample)

Directions

Unwrap all the chocolates and set aside. In a mixing bowl, combine the flour, baking soda and cinnamon. In another bowl, cream the butter with the sugar. Beat in the egg.

Vampire Bite Cookies

Gradually add the flour mixture and blend until smooth. Tint with red food coloring. Shape the dough into a ball. Cover and refrigerate for at least two hours.

Vampire Bite Cookies

Remove the dough from the refrigerator and divide in half. Place the other half of the dough back in the refrigerator while working on the other half. Shape into a flat disc. Place between two sheets of waxed paper. Roll out to ¼ inch thick. Use a lip cookie cutter to cut out shapes (or use a knife to free-form lip shapes). Refrigerate the lip shapes while working on the other half of the dough. Repeat by re-rolling dough scraps, if necessary. Sprinkle red sugar crystals on the lip-shaped cookies. Place on a cookie sheet lined with parchment paper. Bake about 7-8 minutes (do not overbake or the cookies will be too hard) in a preheated oven at 375 degrees F.

Vampire Bite Cookies

Remove from the oven and quickly press a mini chocolate caramel candy in the center of the cookie. Place cookies on a wire rack to cool completely.

Vampire Bite Cookies

Roll out a small piece of white/vanilla fondant. Slice tiny triangles into fangs. Use a food-safe brush and use water as an adhesive on one side of the fondant fangs.

Vampire Bite Cookies

Position two fangs on top of the chocolate. Arrange cookies on a platter and serve. Yield: Varies on the size of the lip-shaped cookie cutter (we used a 2-inch cutter, which yields about 2 ½ – 3 dozen cookies).

Vampire Bite Cookies

Notes

  • For another Dracula-theme dessert, make Vampire Bite Cupcakes.
  • The cookies tend to puff up slightly when baking. For a more defined lip shape, outline the edges with red gel or cookie icing.
  • If fondant is not available to make the fangs, simply substitute white icing and pipe sharp teeth shapes over the candy.
  • Thanks to Margarita F. of M5 Cake for letting us borrow the lip cookie cutter for this blog recipe post.

Walnut Brain Candy Skulls

Walnut Brain Candy Skulls

October 31:
Halloween

Create a cute yet creepy cranium candy to show appreciation to your Halloween host or hostess at the next ghoulish get-together! Walnut brain candy skulls make a great and gruesome gift for Halloween when you package them in a candy box for a petrifying presentation. The small sweet skeleton heads are molded from melted white chocolate and the “brains” are walnut halves coated in pink confectioner’s candy. At Halloween parties, these tiny treats are truly good to eat!

Recipe

(Inspired by Figs with Bri – Rest in peace, Bri)

Ingredients

  • White confectioner’s candy wafers/candy melts/white chocolate chips
  • Walnut halves
  • Pink candy melts
  • Red tube icing gel (optional)

Directions

Melt the white candy according to the pacakge directions (microwave, double boiler, etc.). Stir until smooth. Spoon into the cavities of the mini-skull molds. Refrigerate to set.

Walnut Brain Candy Skulls

Unmold the skulls. Using melted white candy, spread some on the back of one half of the skull and “glue” together with the matching half. Refrigerate to set. Slice the top of the skull with a sharp knife. It may be necessary to use melted white candy to glue the halves back together.

Walnut Brain Candy Skulls

Melt the pink candy according to the package directions (microwave, double boiler, etc.). Brush the crumbs off the walnut halves and immerse them into the melted pink candy. Place on a sheet of waxed paper to set.

Walnut Brain Candy Skulls

Spread some melted white candy on the pink walnut “brain” and attach it to the top of the sliced-off skull. Repeat with the remaining brains and skulls. Refrigerate to set. Place in mini-cupcake papers. Drizzle red gel icing to look like “blood” (optional).

Walnut Brain Candy Skulls

Notes 

  • White chocolate has an ivory/light yellow color to it. For whiter skulls, use white confectioner’s candy wafers or melts, which can be found at local craft and hobby stores.
  • Add a few tablespoons of vegetable shortening to the melted candy for a liquid consistency. It helps to make it smoother and easier to pour into the chocolate molds.
  • We used the Wilton brand 3D skull candy mold for this blog recipe post.